Having installed the Easysoft SQI-Unisys LINC Developer Driver, you can immediately demonstrate a connection to an LDA III Runtime Database.
This section contains exercises to demonstrate the Easysoft SQI-Unisys LINC Developer Driver connecting to and amending data in two LDA III data sources.
Although the exercises were created with and make reference to Microsoft Access, they can be carried out with any ODBC-compliant SQL tool.
This section assumes you have the Sample_LDAIII User DSN connected to the Easysoft sample database.
You should have received a SAMPLE database when you obtained LDA III from Unisys.
The Sample_LDAIII User DSN, created as part of the Easysoft SQI-Unisys LINC Developer Driver, is to be used with the following changes:
Refer to "Creating a data source" on page 38 for more information on how DSNs are configured.
Both the sample model supplied with LDA III and the sample database supplied with the Easysoft SQI-Unisys LINC Developer Driver contain the following tables:
1. Start Microsoft Access, create a blank database and then save it as db_lda.mdb.
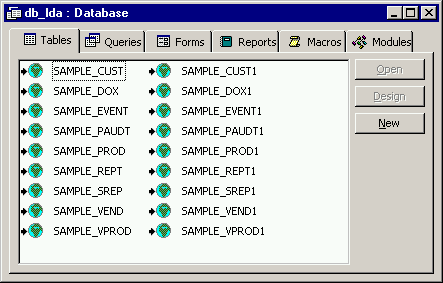
A Database window is displayed, which currently has no tables. It is now necessary to link to the tables containing the source data.
2. Select File > Get External Data > Link Tables to begin connecting to the sample database and its tables, installed as part of the Easysoft SQI-Unisys LINC Developer Driver.
This displays the Link window, in which the appropriate database can be selected.
3. From the Files of type drop-down list, choose ODBC Databases.
The Select Data Source dialog box is displayed:
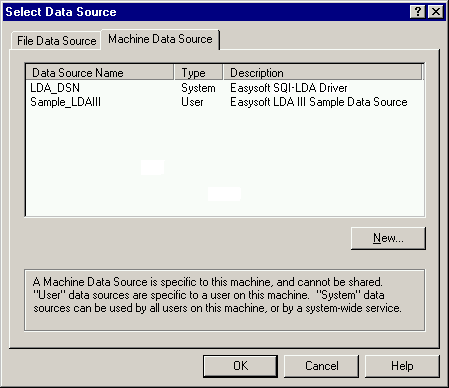
4. Click the Machine Data Source Tab, select Sample_LDAIII and click OK.
The Link Tables window displays the following list of tables:
| The list of tables displayed is not a complete listing, because the Ispec profile option was chosen in the Sample_LDAIII DSN. |
5. Click Select All to select all the tables shown, then click OK.
This will then link all the displayed source tables, before returning to the Database window, where the destination tables may then be selected.
1. Select File > Get External Data > Link Tables to begin connecting to the sample LDA III Runtime database.
This displays the Link window, in which the appropriate database can be selected.
2. From the Files of type drop-down list, choose ODBC Databases.
The Select Data Source window is displayed.
3. Click the Machine Data Source Tab, select LDA_DSN and click OK.
The Link Tables window is displayed, which due to the Ispec profile option being chosen in this DSN, will contain the same number of tables as displayed for the previous DSN used.
For more information please refer to "Determining Profile Record Selection Criteria" on page 42.
4. Click Select All to select all the tables shown and then click OK.
This will then link all the destination tables into the database before returning to the Database window.
| The LDA_DSN table names selected will have the suffix 1 applied to them, because the table names are identical in both databases. |
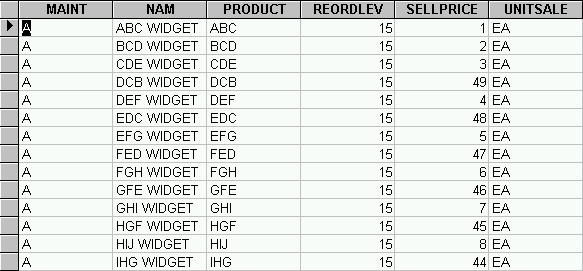
5. Select the SAMPLE_PROD table and click Open.
The data within the SAMPLE_PROD table is displayed:
6. Select the SAMPLE_PROD1 table and click Open.
An empty SAMPLE_PROD1 table is displayed:
Appropriate SQL statements must now be used in order to populate the empty table with the data from the populated table.
Although the process of populating the empty tables may be done by either the Microsoft Access Query Wizards, the Select Query window in Design View or by using drag-and-drop, it is also possible to use SQL statements to perform this task:
1. Click on the Queries tab and click New.
The New Query window is displayed.
2. In order to not use query wizards select Design View and then click OK.
The Select Query window is displayed, showing that no tables or fields are currently defined.
4. Select View > SQL View to display the Select Query window in SQL mode, which now allows SQL statements to be entered directly.
The empty tables must now be populated from the source data tables by using the SQL statement INSERT INTO.
1. By default the statement SELECT; is displayed, which should be deleted and replaced with:
INSERT INTO sample_cust1 (credlimit, [cust-type], customer, deladd1, deladd2, deladd3, maint, nam, postadd1, postadd2, postadd3, salesrep)
SELECT credlimit, [cust-type], customer, deladd1, deladd2, deladd3, "A" AS maint, nam, postadd1, postadd2, postadd3, salesrep
2. Select File > Save and name the file Populate_CUST.
The remaining queries can then be created.
3. Create the following statement and save as Populate_PROD.
INSERT INTO sample_prod1 (maint, nam, product, reordlev, sellprice, unitsale)
SELECT "A" AS maint, nam, product, reordlev, sellprice, unitsale
4. Create the following statement and save as Populate_REPT.
INSERT INTO sample_rept1 (maint, report, reptcode)
SELECT "A" AS maint, report, reptcode
5. Create the following statement and save as Populate_SREP.
INSERT INTO sample_srep1 (area, maint, nam, salesrep)
SELECT area, "A" AS maint, nam, salesrep
6. Create the following statement and save as Populate_VEND.
INSERT INTO sample_vend1 (maint, nam, postadd1, postadd2, postadd3, vendor)
SELECT "A" AS maint, nam, postadd1, postadd2, postadd3, vendor
7. Create the following statement and save as Populate_VPROD.
INSERT INTO sample_vprod1 (rowid, comments, maint, product, vendor)
SELECT rowid, comments, "A" AS maint, product, vendor
You will then need to implement the SQL statements created, in order to begin populating the empty tables with the test data.
1. To implement the SQL statement and populate the empty table, select Populate_CUST and click Open.
If confirmation messages are enabled, Microsoft Access will ask for confirmation to run the append query and modify the relevant table.
The system will ask for further confirmation, indicating the number of rows that are about to be appended.
6. Exit Microsoft Access by selecting File > Exit.
You can now use the test data residing in the LDA III Runtime Database.
1. Select Start > Programs > LDA III > Runtime.
The LDA III Runtime window is displayed.
2. Select File > Open Session.
The Select a LINC System window is displayed.
3. Select the SAMPLE system name, and click OK.
This will open a session to allow you to begin testing your LINC system, with the test data now residing in the LDA Runtime Database.
© 1993 - 2024 Easysoft Limited. All rights reserved. Oracle® is a registered trademark of Oracle® Corporation and/or its affiliates. Other trademarks and registered trademarks appearing on easysoft.com are the property of their respective owners.